INDUSTRY
ANSTO models multilayered structures from nanoscale damage profiles

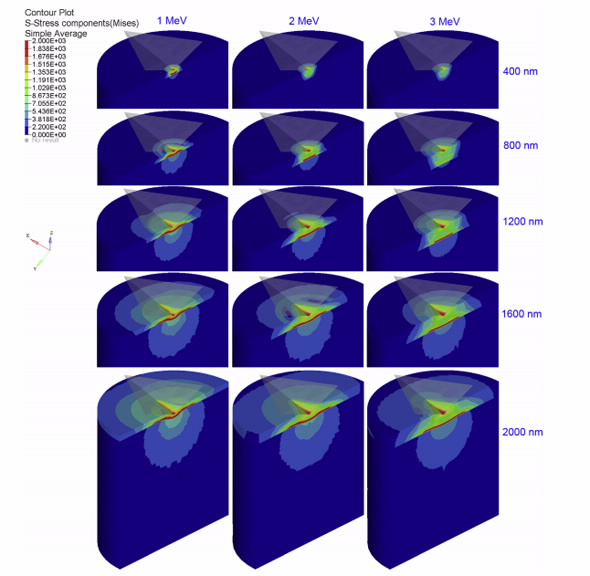
Superomputer modeling of nano-indentation studies performed on ion-irradiated steels has generated 3D stress-field maps on an engineering scale that agree well with experimental results.
The material studied is annealed stainless steel 316, the most commonly used structural alloy in marine, chemical, petrochemical, transport, manufacturing and the nuclear industries.
In the study published in the International Journal of Plasticity, researchers from ANSTO and the University of New South Wales used ion irradiation, nano-indentation and electron microscopy to gain an insight into the relationship between peak damage depth and the corresponding peak hardness depth caused by irradiation.
“What we gain from the model is something you can’t observe experimentally, especially in a visual manner, that is, a three dimensional stress state in a multilayered structure as generated by ion irradiation,” said lead author Michael Saleh, an ANSTO materials researcher, who develops simulations of advanced materials in extreme environments.
“There have been models created with a hard and soft layer, but in these simulations we were looking at multiple layers at a nanometre scale where the gradient was high and the calculation of stresses was complex.”
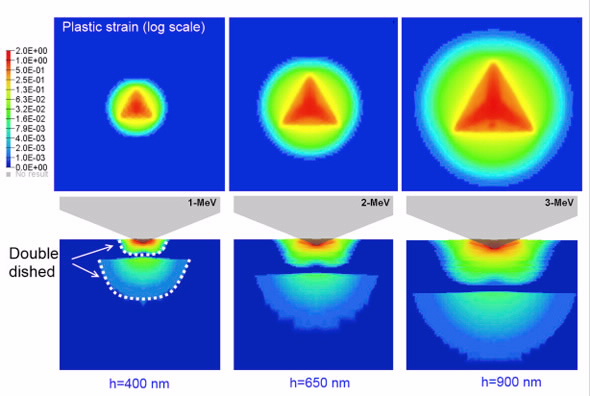
In the simulations, at the position of peak hardness, the plastic strain contours exhibited a double dished plastic zone profile.
“This was nothing less than a revelation as the plastic zone was expected to be continuous spherical stress,” said co-author Dr Dhriti Bhattacharyya, a senior materials engineering researcher, who carried out the nano-indentation and analytical calculations.
 |
|
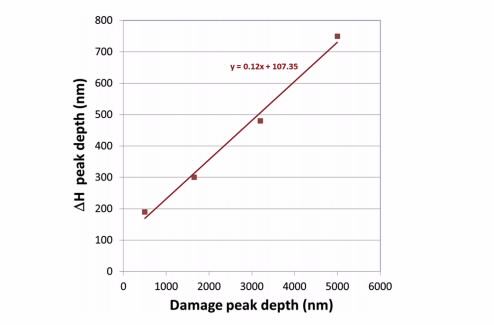
Plot of Depth of hardess peak (dH) vs Depth of damage peak (dD) for top down nano-indentation method. |
The investigators also found a simple linear relationship between hardness peak depth and damage peak depth, which has implications more broadly for layered materials.
The goal of the research was to understand the effect of radiation on the mechanical properties of irradiated material. Ion irradiation provides a fast and non-active method of achieving high damage doses. However, this irradiation procedure causes different amounts of atomic displacements or damage to occur in the material at different depths, creating a thin layer of material with a large gradient in hardness (as a series of nanometre scale layers of varying strength). The study of the mechanical property changes through the thickness of the affected layer is highly challenging. Nano-indentation provides a relatively easy way of probing the modified surface; however, the interpretation of the results is complicated by the layered structure and the 3D stress-state around the indent.
Ion irradiation
Annealed stainless steel (SS316) was irradiated with helium ions at 1, 2 and 3 MeV on the STAR accelerator causing atomic displacement damage at various depths.
Co-author Prof Mihail Ionescu, Interim Leader of the Nuclear Fuel Cycle, supervised the ion irradiation at ANSTO’s Centre for Accelerator Science.
Ion irradiation causes different amounts of atomic displacements or damage to occur in the material at different depths, creating a series of layers of differing hardness.
Irradiating a target sample with high energy ions can cause the same damage that would require many years to accumulate in a nuclear reactor. This type of irradiation makes it easier to handle the test samples as they do not become radioactive in general.
Nano-indentation
“We undertook nano-indentation because it can be used to measure the mechanical properties after ion irradiation,” said Bhattacharyya.
Ion irradiation caused hardening at shallow depth with measurable and defined peaks in hardness.
The surface of irradiated and unirradiated samples was nano-indented with a triangular shaped pyramidal tip to a depth of three microns.
“Nano-indentation induces complex 3D states of stress in the materials, which is further complicated in layers with different strengths. It also creates a very large plastic volume around it,” said Bhattacharyya.
Using analytical methods, Bhattacharyya was able to predict the increase in hardness at various depths at three different energies with reasonable accuracy.
 |
|
Experimental and numerical measurements for SS316 irradiated by 1 MeV, 2 MeV and 3 MeV He2+ . The bar graphs show the dpa used in the numerical models. |
“Using an averaging mechanism over the plastic zone, it provided a relatively quick way of estimating the hardness increase due to any amount of damage within the modelled range,” said Bhattacharyya.
“However, peak damage and the peak hardness do not occur at the same point in the material, it reaches peak hardness before peak damage, and we wanted to understand the reason for the difference,” said Bhattacharyya.
“You get much greater hardness closer to the surface, by virtue of the stress field that travels ahead of the nano-indentation tip.
“When you are piercing the material, it is already sensing the lower layers, which it hasn’t reached.
“The plastic zone is the region around the tip, which is causing plastic deformation and the hardness value that you sense is actually the average of that volume.
“But in a layered material, it will start to sense the harder layers below it before it actually reaches there. It reaches the peak sooner.”
The difference in profiles at different energies can be explained because the hardness is based on averaging over all the layers and the distribution of layers is changing at different energies.
Supercomputer modelling
“We took some neutron data from the literature, which had established hardening schemes with correlations between displacements per atom (dpa) and hardening as a starting point. With mathematical fitting we were able to make a lot of refinements to the model,” said Saleh.
Generally, the models slightly over-predict but do align well in terms of strength and peak position. They are within 10 percent and, generally, that is very good in a multilayered structure.”
In the models, the radius of the plasticity zone was eight to nine times the depth of the indent, not three to five as had been predicted elsewhere.
 |
|
Contours of plastic strain at peak hardness detected by model. Top view and vertical cutaway shown |
“If you can establish a reliable methodology, whereby you can analyse whether your component will fail by simple nano-indentation, there would be an enormous amount of interest from industry,” said Saleh.
“This gives us a means to predict expected hardness peak positions and values for radiation doses. But the fundamental principle behind the experiment will work for all layered materials. The material doesn’t even need to be irradiated,” said Bhattacharyya.
“Once we know the strength and other mechanical parameters, we can work backwards and work out the damage profile.
The study brings not only an understanding of the radiation-induced changes in the surface properties of materials, but a greater understanding of the nanoindentation process in multilayered materials in general.
The modeling results provide information on mechanical properties that are scalable to engineering dimensions.”
The investigators are continuing studies of other ion irradiated materials with multiple phases and different crystal structures.

